Seasons!

Our house is in the market now, officially! And the walk throughs have begun.  Oh. My. Goodness.  

So much cleaning! We are officially entering what I feel is going to be a chaotic season of life.  

It has been an intense weekend with our first walk through on Friday, a house full of our country rellies tag teaming their way through, another two walk throughs yesterday and one having a second walk through this morning.  

We also have school holidays here so with all that's going on the blog may be a little quiet, but I'll be back I promise!  

I hope everyone has lovely school holidays and is enjoying the beginning of spring.  

This girl is finally completely finished ready to go to her new home.  


Much love, 
Emma
Xx

A weekend away!

Our sweet William turned 8 on the weekend - can you believe it?!  A whole 8 years this little man has blessed our lives! 

We went camping so I thought I would share some photos.  Here is the old van we renovated - you can see clear pictures of its inside HERE (the old van reno's)

This caravan has allowed us to have cheap, quick local weekends away.  We pack all our own food (with a few holiday treats!) and a quick BBQ for dinner with fresh bread and salad, the ability to pack lunch, drinks and snacks also is fantastic. 


Setting up Williams birthday pressie - very special bought off Gumtree for an amazing bargain of $275 and with the aid of grandparents as a joint present. 
 Henry has found his spot!
 William setting up his tent.
 The beautiful jetty just a short stoll form our campsite.

 Where is Henry's legs?!
 Coloring in a quiet moment.
 This sweet babe, melts my heart.  Each night as I went to bed, my heart was full from the time we all spent together.
 beep beep!  At the adventure park!
 Check out that concentration!
 WEEEEEEE!!!!
 Little boys won!
 Paddling on the lake.

 Finding natures treasures.
 RUNNING FREE!!
 More treasures!

 Exploring the shallows - it never grows old does it?
And the happiest of birthdays to my darling William, the child that made me a Mother, together we fumbled through those early days, clinging to each other, relying on each other while I found my feet in this thing they call motherhood.  I am still learning every day, still exploring and somehow even more in love with him today as I was the day he was born.  A kind of fierce love I didn't know possible until this babe was laid in my arms. <3

Much love,
Emma
xx

A tour...

I love looking at others houses, so seeing as the house is on the market and I have been getting it ready for marketing photos I thought I would give you a tour so you could sticky beak!  It is very rare that this many rooms in my house are this tidy all at once....ha! (rarely = never)

This is the kitchen.  That's my little wooden child hood rocking horse on the left there.
 The dining room.  The kitchen dresser is filled with mementos from grandparents and all things sentimental.  
 It just feels right to have a kitchen sink that looks outside. 
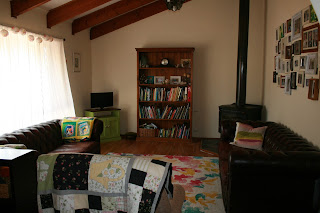
The lounge with the wood fire to the right.  Hand made quilts are draped over the back of chairs ready to snuggle in.
 The lounge looking toward the entrance, the front door is just off to the right.  As you can see I clearly love photos!  
A little "nook" for the boys, they have a CD player there for audio-books and can curl up there for quiet play, tucked away. 
The hallway, exciting stuff!  haha!
Our room.  Simple, not fancy but bright and peaceful.
Henry's room.
William and Angus's room.
Bathroom, small but functional.  Until 5 of us are trying to brush our teeth at the sink....yep...
The backyard, we spend load of time under the pergola.  Reading, relaxing, meals and just hanging out.  Perhaps my favorite area. 
Some herbs and greens and so forth.  The Jasmine climbing up the trellis in from of the shed smells amazing.  I have been picking it and popping it in little vases on our kitchen table. 
EDIT: I forgot the lined out shed which acts as a sewing room/kids retreat/guest room.  We would never buy such a big TV these days, but it was the time of our lives we were in! 


Our house is not fancy, but it is homely.  It is our place, tucked away from the world.  What more does one need?  

Much love,
Emma
xx

Spring.

It is officially spring time and the days are slowly brightening up and growing longer!  The promise of the growing season is here.  Its time to source more pea straw, manure and prep the gardens.  Our spinach and leafy greens are coming to an end and so is our chilli plant.  I need to pick the last lot and dry them.  Our herbs are springing back to life!     

The little ones and I have been enjoying slow morning walks around the neighborhood and pottering in the garden while Will is at school.  Third term of Kindy for Angus is nearly over and he will be starting school visits next term.  Goodness how time fly's.  I LOVE Kindy year, I wish it could go for two years! 

My boys are growing up.  William lost another tooth.  The tooth fairy dutifully visited!


Will is 8years old later this month.  He has asked for a tent, so we can go camping together.  I remember the day he was born as if it were yesterday looking at amazement at this tiny human we had just created.  He was the most beautiful baby I had ever seen.   

Good quality damping equipment is really expensive.  But we bought this tent off gum-tree, never been used.  It is a 4 man Blackwolf tent, with its posts and inner tent all connected, all you do is lay it out, crawl inside and push up the middle and it all clicks into place with special joints.  It was around approx a $900 tent originally, the people had one and the zip broke on their old one and Blackwolf replaced the entire tent for them.  Then they ended up upgrading to a camper van and were happy to sell the tent off for a bargain.  We bought it for $275 and the Grandparents are pitching in birthday money towards it as it is more then we would spend.

We will be going camping near the beach for his birthday, which will be just lovely!  

It will never cease to amaze me what people will sell second hand, often near new for a fraction of the price in the store.  We rarely but new now, it has saved us many thousands of dollars!  It may take some patience, but mostly we have found the things we need second hand, better quality then we would be able to afford new.  We are such a consumerist society, it saddens me to see so many people chasing happiness when it is in fact, quite often, right in front of them.  

Anyway, I have gotta dash, finish off my morning cuppa and get my big boy ready for school photos!

Much love,
Emma
xx  


A simple raggedy quilt tutorial

I love quilts, the big beautiful complex ones never cease to amaze me with the skill, effort and commitment they take.  For me they are above my skill level and beyond my time frame....But I still love the idea of homemade quilts so here is a simple beginner-friendly quilt tutorial for a raggedy quilt.

You can make the squares as big or as small as you like, though the bigger you make the squares the quicker the quilt comes together and the less cutting is required. For this one I did the feature front material and the backing material in 10inch squares due to the size of the print. I do have a cutting board and a rotary cutter which is quicker but you can easily do it by cutting a template of baking paper in your preferred size and pinning and cutting by hand with scissors. Then the inside wadding I cut in approx 9inch squares.

Each square goes together like this:

Top facing out wards

 The middle layer which is smaller then the outer layers

The back layer with the 'pretty' side also facing outwards.

Pin each square together firmly with the materials in this order. For my quilt, I had 36 10inch squares to pin and sew.

Then it is a simple process of using a regular straight stitch making an 'X' from one corner to another like this.

When you have sewn the 'X' on each square arrange your squares in a pattern you are happy with like this.

Then pin them together with the seams facing upwards so the top is messy and the back is smooth like this.

Do this for each row one at a time using plain straight stitch sewing each seam about 1.5cm from the edge, being careful to capture your inner wadding.

Once you have sewn your rows together then sew each row to one another using the exact same method. Being careful to gently feed the thick seams through out machine. It is A LOT of material to get through! I found it also helps to use a really new, sharp needle for this stage.  And good quality thread - really anything that stops your machine having a tantrum.  I'm not sure about your machine but mine can be moody!   

Trim off any overhanging wadding so that it is trim to the seam line. This is important as you don't want the wadding hanging out when you raggedy it - it will look neater when finished.

Then when you have sewn all the squares together so it looks like a quilt sew an 'outer boarder' around the very outside 1.5cm from the edge.

Then simply 'snip' all the seams up roughly 1cm apart, including the outer edge, but be very careful not to cut over the sewing line like this.

Then put in through the washing machine and the dryer which assists in the seams becoming 'raggedy'. A good tip if you don't want fluff through your own is to use the ones down at the laundromat.

The end product should look something like this

Back (yep, I didn't plan my back pattern.  It gave me a headache...But if your more particular you can or stick to just one color/pattern of fabric.)

Front

Handy tips to make it more frugal:

- op-shop flannel sheets/materials

- Buy flannel sheets when they are on sale at the end of winter. You don't need a lot of different types of materials if it helps your budget - a simple checkerboard effect looks great too!

- Recycle an old woollen blanket which is often easy to source from an op-shop for the inner wadding.  I usually pick up vintage pure Australian wool blankets from the op-shop for $5.  A pure wool blanket will add warmth and also weight to the quilt when finished. Just give it a good wash or two and hang it in the sunshine to dry and air out first.

- You can use plain cotton for the front if you wanted and then just line it with a co-coordinating flannel for the back - I do think the flannel is important for helping it become 'snuggly'.

Good luck! Let me know if any of my instructions are not clear, I'm happy to help if there are any questions.


Warmly,
Emma
xx
Powered by Blogger.